Maintain a master list in Excel
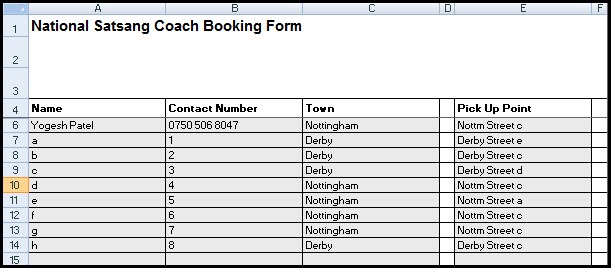
The original master list template was built with the intention to manage the bookings of seats for bus/coach services to a church. For each booking, the administrator must enter the name, contact number, pick-up point, number of seats booked and amount due in the master worksheet. The list is intended to captured the bookings and also to generate reports that can be given to the bus drivers and also to make sure that there is no over-booking of seats. To manage the data entry, the data are
organised with each customer booking for multiple days all presented in the same row. A common layout that most people would have used for their data entry. Click on the link to download the original master list template.
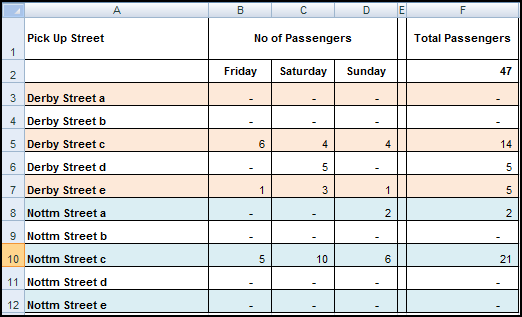
The data captured is then used to prepare 2 reports, the day and the number of people to be picked from various pick point, and the contact details of the customers who have made the booking. To generate the 2 reports, the company has to refer to the master worksheet and manually tabulate the data into 2 different reports, presented in the “Passenger pick up Qty” worksheet and the “Passenger pick up list” worksheet.
In total, the company administrator has to update the same booking 3 times. If there are any amendments, it must be done in 3 worksheets, master, passenger pickup Qty and passenger pick up list.
What was done right for the master list?
The company created a dropdown list using data validation for the town so that the administrator can easily select from the drop down list. This also eliminates data entry error. The pick-up point selection is created with another drop down list which is dependent on the town selection. This is done through the use of named range and the INDIRECT formula.
What needs to be improved?
In the master worksheet, the data from column F should not be organised this way. Instead, there should be only 3 more columns, date, number of seats, and amount. The new layout is good source for Pivot Table and reporting. There shouldn’t be any empty column as well, one of the basic requirements for Pivot Table. Therefore, the data you see in the original worksheet should be re-organised in the following way:
Note that the Pivot Table can only have one header row so we have shifted down the header description for qty and the price. The number of rows have also increased. Each row represents one booking per day. For Yogesh, the booking becomes 2 rows, one for Fri (1 pax) and another for Sun (2 pax). The date are entered into as proper Excel dates which can be changed anytime to your preferred format. Most important of all, it is good for the referencing within formulas and reporting. With the master list data organised in this way, the 2 reports can be easily updated by using formulas or Pivot Table as explained below.
To report the booking by pick up point and no of passengers for each day, the dates in column B, C, D (row 2) of the worksheet “Passenger pick up Qty” should be entered with the proper Excel dates. Enter the dates (in our example, we have reset the days for Fri to Sun as 8 Feb to 10 Feb 2013. To present it as Fri to Sun, you can simply reformat the date in “ddd” format using the custom category. To find the number of pax for each day and by pick up point, use the SUMIFs formula. SUMIFs is a mutliple conditional sum formula, new from Excel 2007. The formula for cell B3 should be
=SUMIFS(Master!$F$5:$F$22,Master!$D$5:$D$22,$A3,Master!$E$5:$E$22,B$2)
=SUMIFS(Master!$F$5:$F$22,Master
!$D$5:$D$22,$A3,Master!
$E$5:$E$22,B$2)
Take note of the dollar sign ($) in cell A3 and B2. The setup allows the formula to be copied to all the other cells. That completes the first report. If you need to extend the range, makes sure all the ranges which end with row 22 are increased at the same time.
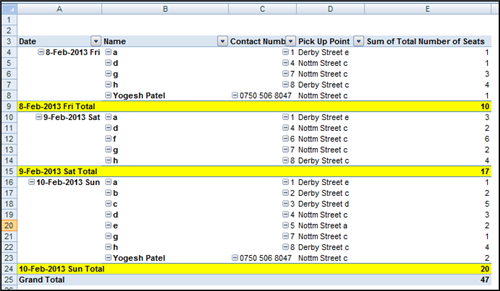
For Report 2, I would recommend a Pivot Table. Even though it does not have the same layout as the original report 2, the information presented are organised in the same way. This is recommended because it allows update to be done instantly with just a few clicks and is very manageable for an administrator with average Excel skills.
With the change, you can now easily add new entries or amend the existing entries into one single worksheet labelled as the “master list” and the changes would easily be updated into the reports. The revised copy can be downloaded here.
New! Comments
Have your say about what you just read! Leave me a comment in the box below.
Share this page:
Enjoy this page? Please pay it forward. Here’s how…
Would you prefer to share this page with others by linking to it?
- Click on the HTML link code below.
- Copy and paste it, adding a note of your own, into your blog, a Web page, forums, a blog comment, your Facebook account, or anywhere that someone would find this page valuable.
<a href=”http://www.advanced-excel.com/”>Advanced Excel – From a Business Perspective</a><a href=”http://www.advanced-excel.com/”>Advanced Excel – From a Business Perspective</a>

Excel Courses for Business Professionals
Copyright © advanced-excel.com 2007 – 2019. All Rights Reserved. Privacy Policy
Microsoft® and Microsoft Excel® are registered trademarks of Microsoft Corporation.
advanced-excel.com is in no way associated with Microsoft


